by Stefan Müller
Every store is individual. Thus, many store operators wish to leave the uniform look behind and present offers and products individually. The Smartstore store system already offers many possibilities.
With content management tools like pages, widgets, content sliders, menus, the themes, video streaming and the beautiful designs from the Page Builder, store owners can easily and simply create great content that will delight customers and lead to sales.
Even for the article detail pages, i.e. where exactly one single product or product bundle is offered and ordered, there are ways and means to have its own presentations, simply to have presentations adapted to the product.
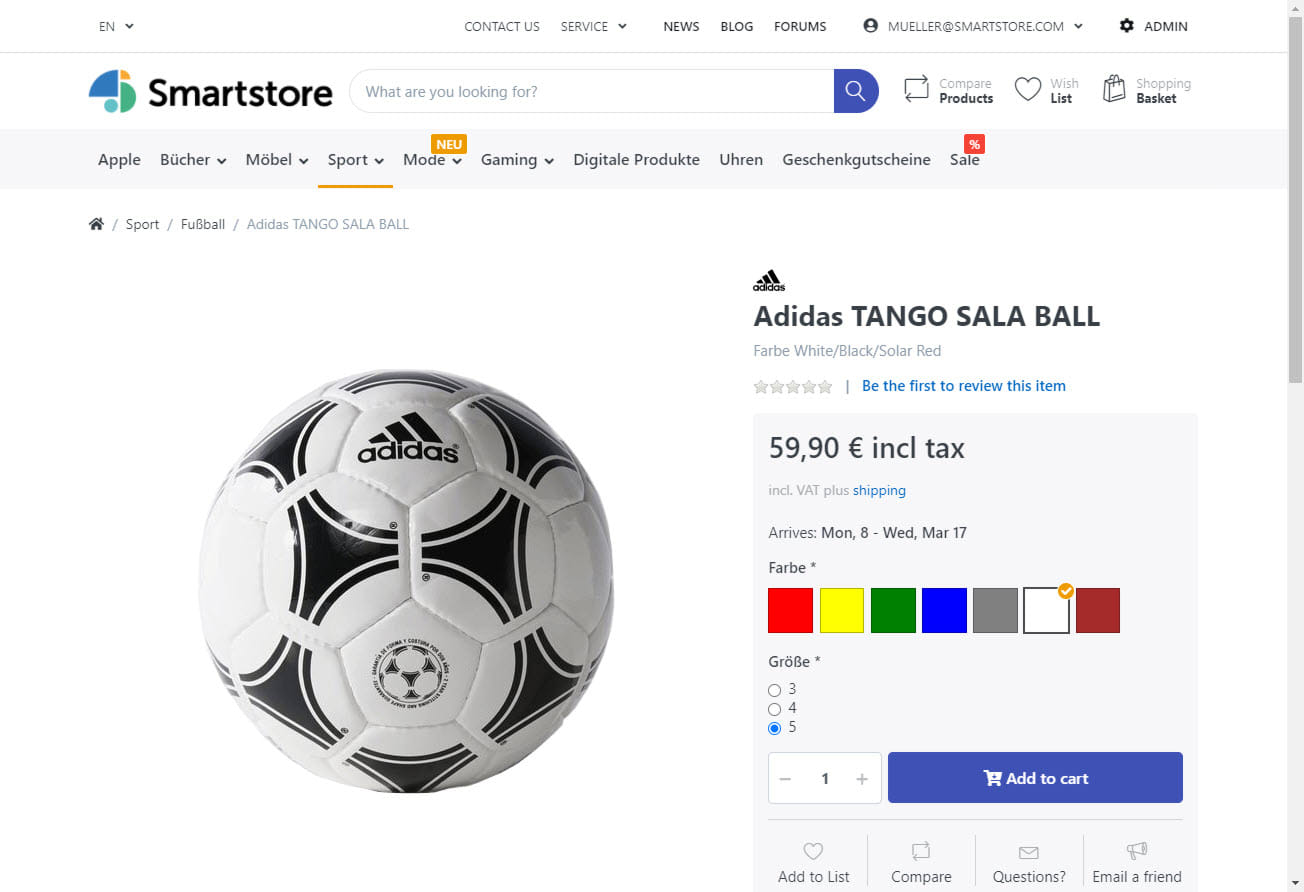
A simple example: the single article is presented in the default setting in the always same way: left the item images, right the selection box with price and variants. Below then the long text and further descriptive elements. This is for 99 percent of the stores the best offer presentation, many customers know it so and the most important, have the ordering technique so "learned" and internalized.
But what if this is not enough for your offer?
- You have complex, variant items, and the variant selection needs to be prominently highlighted accordingly?
- The scale price table is essential and should be presented more conspicuously, still above the item image?
- You need own input fields, for example, for customer specifications for custom-made textiles or furniture, which are in the store standard are not provided?
A simple example: swap elements
.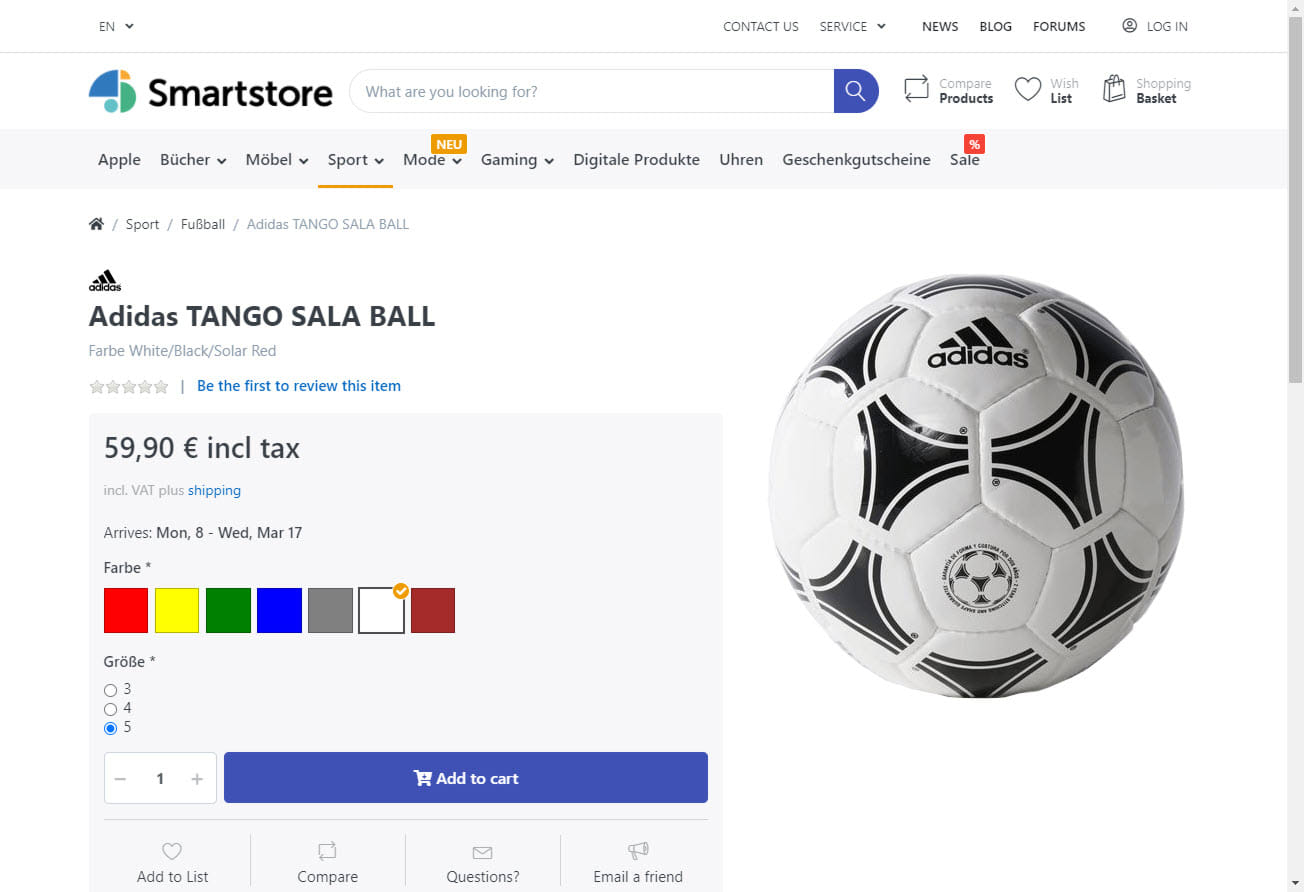
To demonstrate the flexibility of item presentation in Smartstore, here is a small example. I would like to change for some selected Items swap the placement of the "Item images gallery" and "Product box" elements. From left to right and the other way around. How do I do that?
The answer: design templates!
Build yourself a new design template for the product display. A design template defines how the product is displayed on the Item detail page is displayed in the front-end area of your store. With one or more custom template you are completely free how your Item page looks like!
-
For the initial creation of design templates, there is no user interface in the store system. This is done by the Store operator or his technicians in manual work done by creating new product templates via
CSHTMLfile(s) and announcing them to the store system via database entry. -
For the later selection of design templates, a technician is no longer necessary. In the product admin area there is a Selection box for the design templates. Any end user can cope with this.
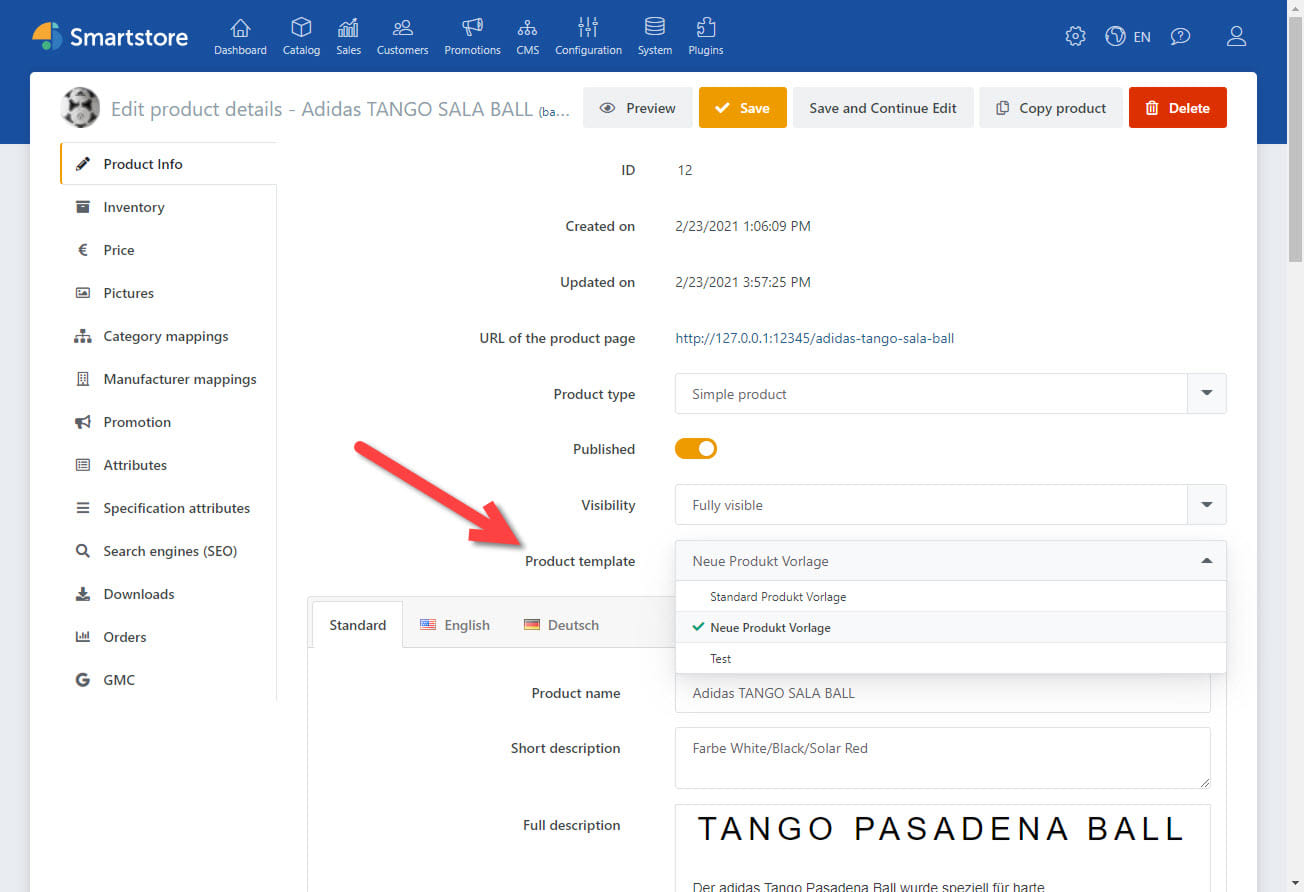
One design template can be selected for each product. So for any products you can decide whether they should be designed by default or presented with your template A, B or C.
Your choice of design template will also be included with the rest of the item data during item data export, and will also be included again during the article data import also read in again.
How to do it
Step 1a: Create a View
A view is the special file Product.cshtml in the store system folder Views -> Product.
The best way to do this is to duplicate the default product template "Product.cshtml" in File Explorer and rename your copy to. "ProductB.cshtml". You can then safely edit this duplicate using a text editor such as Notepad++.
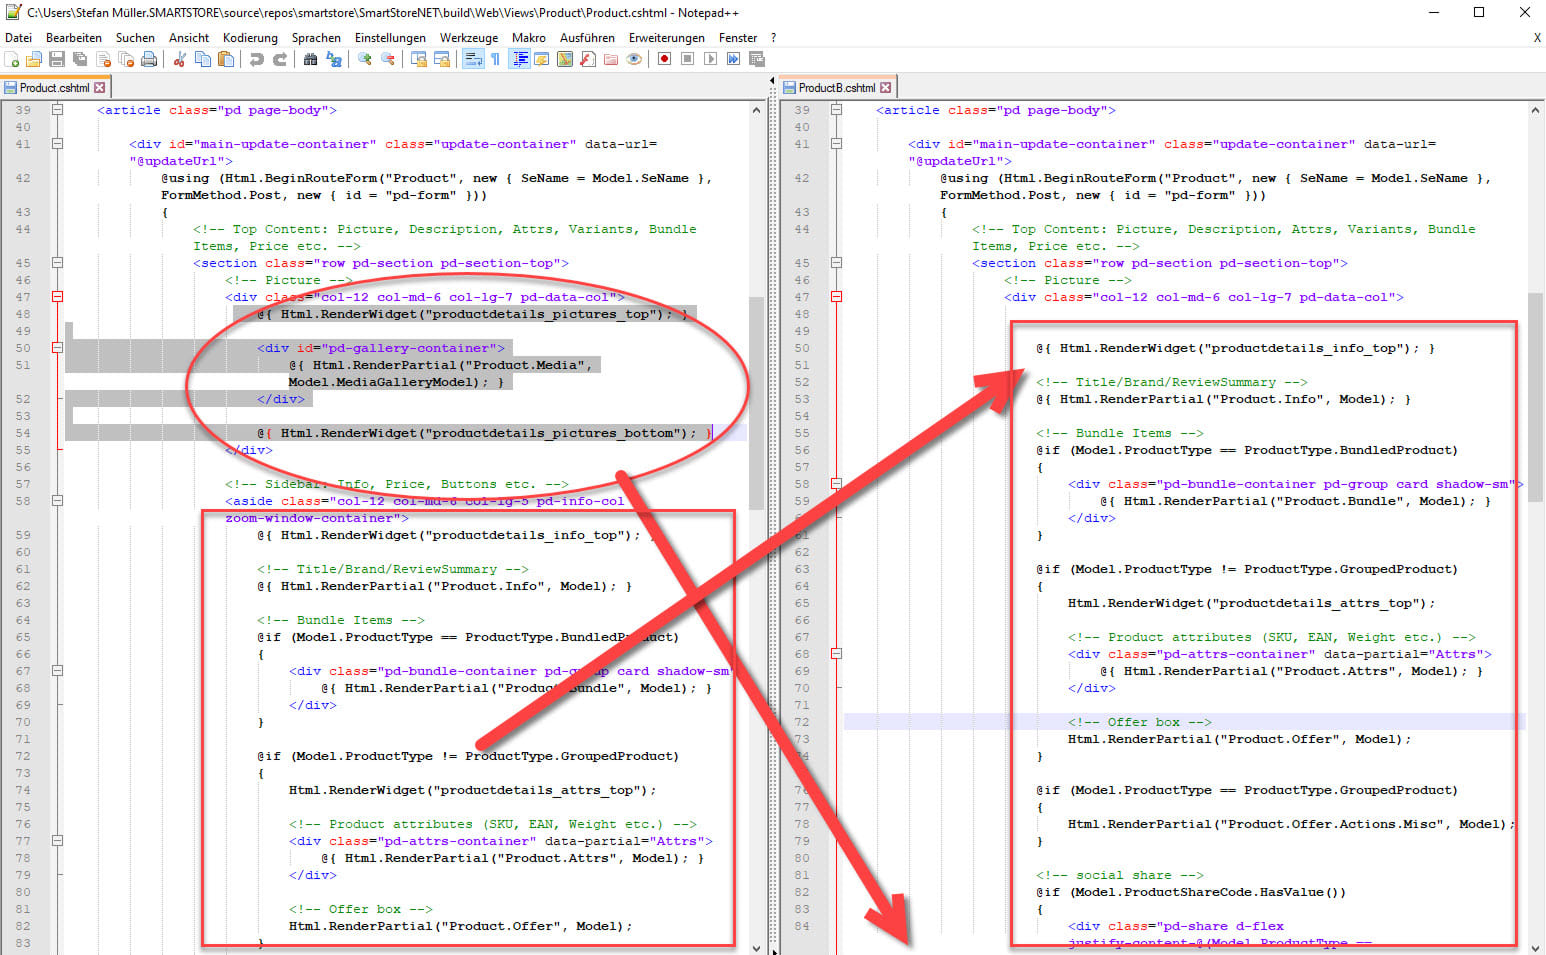
- Your new
ProductB.cshtmlcontains HTML format code for the web browser as well as active instructions in so-called "Razor" code blocks. An illustration of how to write or modify individual Razor instructions, would go too far for this article. In principle, Razor works similar to the very well-known PHP from the Linux world. Razor instructions are translated live and individually into HTML for each store customer, similar to PHP instructions. Webbrower. This is then the way to the 1:1 shopping experience.
Thus you could for very extensive individualization also intervene deeply in the C# constructs yourself, modify or add new code. Please note that it is then not only about a single cshtml file. Many components, such as display of article variants, are included from other places, would have to be replaced accordingly or modified there. Note also that these changes are made by you after Store software updates subsequently entered and may have to be updated to conditions of the new Smartstore version.
If it's purely about moving blocksleft to
right, we only need basic knowledge of HTML structure, some patience and careful work. We go into the
ProductB.cshtml file, find the image gallery block and the product box block,
change the code between the <div>tags easily.
Step 1b: Store the new view in the store files
Your customized product template can be located in one of the following folders
- Themes/[Theme]/Views/Product
- Themes/[Theme]/Views/Shared
- Views/Product
- Views/Shared
Easiest, it is located in the same folder as the default template.
Product.cshtml.
Themes in Smartstore govern general styling such as default colors and fonts. When you store the product template in a theme
it is logically only available in exactly this theme. So if you offer your store customers several themes to choose from
then the product template must be stored in each theme that store customers can use. Or just globally in
Views/Products.
Note: Please make sure that the file permissions are also set correctly in the new file. Which permissions to set is different depending on the system. It is best to orientate yourself on the permissions of the default design template. If the new file does not get the required permissions, the IIS web server will not be able to read the file and then there will be nothing with the display of the new page.
Step 2: Add ProductTemplate table
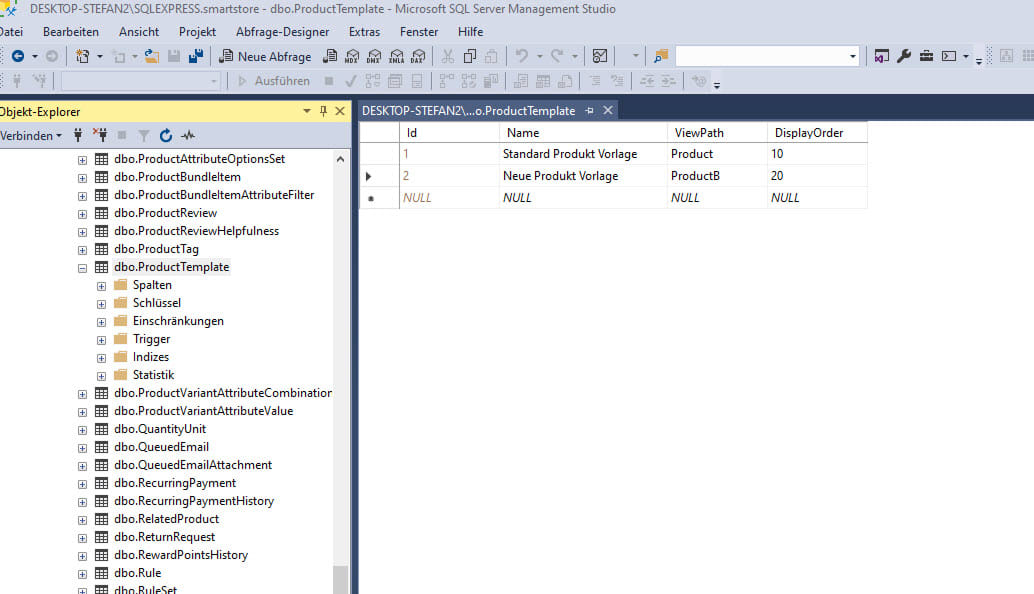
Then you have to create a record in the table "ProductTemplate" with ViewPath "ProductB" by hand. This requires some experience with SQL or a tool: this step works best with Microsoft's "SQL Server Management Studio" tool. In it connect to your store database. In the Smartstore database select the table "dbo.ProductTemplate", a right click above the table name, then from the context menu "Edit top 200 rows".
The Id is set automatically. So in the table in the last row in column Name click on the NULL,
and assign a name. This is only for the information of the store supervisor. "Name" determines what the new design template in the
selection box is called. Please don't mind the red circle with the exclamation mark. Then next to it under ViewPath the NULL.
with the plain file name of the cshtml design template, i.e. without ".cshtml" as well as without file path. Finally a
display order under DisplayOrder. Finish with Enter, the database system will then independently enter the
Id.
Step 3: Smartstore restart
Restart the store system for safety, so that the new design template is guaranteed to be taken into account by the system, this via "Restart", to be found in the admin area in the cogwheel menu in the top right corner.
Step 4: Test the template
In the admin area, under "Catalog", call up a desired product to edit. If all steps 1 to 3 have been carried out, there is now a new selection box "Design Template" is available and the new product template can be set for this item.
.Now select "Preview" and the item detail page will be displayed in the new design.
If not, either the database entry in step 2 is incorrect, for example a typo in the ViewPath for the file name. Or the template file lacks the necessary permissions to be accessed by the web server. Or there is an error in the structure of the ProductB.cshtml file.
Other possibilities
Templates are also available for product groups (categories) and manufacturers, store operators can also create their own template(s) for these and add them to the Store system add. For this one works with:
CategoryTemplate or ManufacturerTemplate
By default, only one entry with the general default template is entered in the corresponding database tables.
If more than one category template exists in the store system, the store administrator will see on the edit/create page of the Merchandise Group a drop-down list, which can then be used to select one of the templates for that merchandise group.
Templates in all editions
.And thus more possibilities to customize the store even more individually. All these options are available in every Smartstore version available, so already but the free Smartstore Community Edition.
